

FOLLOW

Showing posts with label Made By Me. Show all posts
Showing posts with label Made By Me. Show all posts
Monday, August 19, 2013
Old Window as a Picture Frame

Friday, August 16, 2013
Feature Friday ~ 2 Crafty 4 My Skirt on Etsy
I hope you don't mind, today I decided to feature myself!
I have a few things I am very excited to share with you!
First if you follow my Facebook Page, you may have read that I am now a stay at home mom. This is something we have wanted for our family for a long time! I am so grateful to have my business to keep me busy and help with the family finances! Thank you SO SO much to all of you for your support!
Also I wanted to let you know that I recently started an Online shop. I will soon be filling it up with lots of signs and home decor items, but right now it just has a bunch of cute printables in it for ONLY $1.00 each.
Check out my shop!
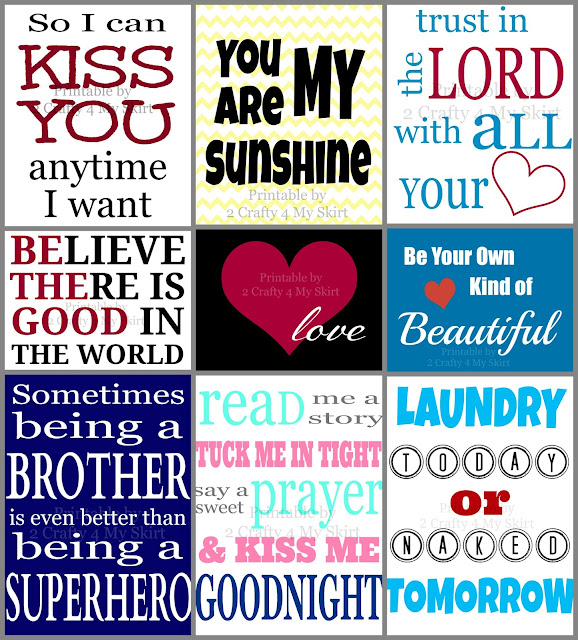
Here are a few of the ones you can find in my shop!
Believe There is Good in the World 8x10 Printable


Being a Brother 8x10 Printable

Nursery or Kids Room 8x10 Printable

Laundry Today or Naked Tomorrow 8x10 Printable

Trust in the Lord With All Your Heart 8x10 Printable

Your Are My Sunshine 8x10 Printable


Never miss a new post!
I have a few things I am very excited to share with you!
First if you follow my Facebook Page, you may have read that I am now a stay at home mom. This is something we have wanted for our family for a long time! I am so grateful to have my business to keep me busy and help with the family finances! Thank you SO SO much to all of you for your support!
Also I wanted to let you know that I recently started an Online shop. I will soon be filling it up with lots of signs and home decor items, but right now it just has a bunch of cute printables in it for ONLY $1.00 each.
Check out my shop!
TODAY ONLY
ALL PRINTS ARE ONLY $.60!!!
Here are a few of the ones you can find in my shop!
Believe There is Good in the World 8x10 Printable

Being a Brother 8x10 Printable

Nursery or Kids Room 8x10 Printable

Laundry Today or Naked Tomorrow 8x10 Printable

Trust in the Lord With All Your Heart 8x10 Printable

Your Are My Sunshine 8x10 Printable


Never miss a new post!
Check out 2 Crafty 4 My Skirt on Facebook for items that you can custom order or just to stay updated on new projects!
This Post is Sponsored by: Alese Stewart Photography, Reclaim-ologist and Other Crafty Chicks, Shabby Apple Dresses, My Own Labels
 , mymemories.com
 , LittleTikes.com
 , Little Giant Ladders
 , Leonisa
Monday, August 12, 2013
DIY Knock-off Bookends Tutorial
This past weekend my little sister called me up and said she wanted to come over and hang with me on Saturday, maybe hit up some yard sales. We found some AWESOME things. One of the things we found were unfinished wood crafts for 10 cents each! I picked up a few stars even though I didn't have anything in mind for them.
My sister is moving to a new house next week and was looking for items to decorate it and furniture pieces for storage. When we got home she was telling me some of her decorating plans. She showed my a picture of these Star Bookends on her phone
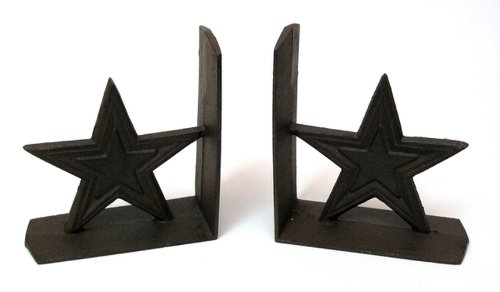
I told her "We could make you some similar to that out of wood....Hey we could use some of the stars I got today. Let's go make some!"
I had a bunch of scrap pieces of 2x6's. I cut them to the dimensions we wanted them.

I put wood glue on the adjoining seam.

And then attached them with a nail gun.

I put wood glue on the points of the star, and then attached it with a brad nailer.

I couldn't think of a good way besides this. I angled the nail just about as straight as I could. Since a little poked out. I did them all from them same side, so that could be the back. I made sure to do them on the opposite side of the other one.

Then I wiped off any extra glue.
And it was done! Ready for paint!

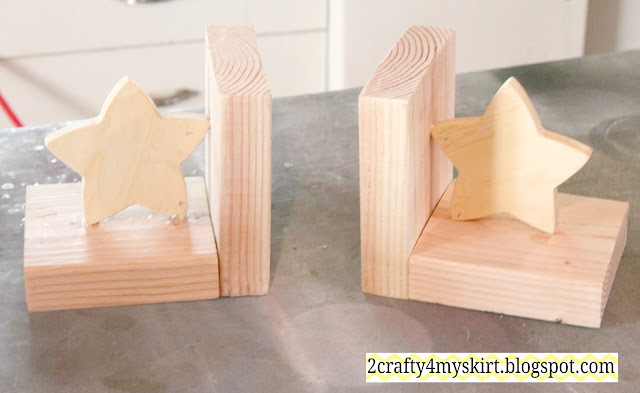
I painted them with the same Hesston Equipment paint that I used on my Front Entry Gate.

All done! Cost me 20 cents. And some scraps and paint I already had sitting around. And they probably took me 20 minutes to make!
I LOVE a good Knock-off!

Never miss a new post!
My sister is moving to a new house next week and was looking for items to decorate it and furniture pieces for storage. When we got home she was telling me some of her decorating plans. She showed my a picture of these Star Bookends
on her phoneI told her "We could make you some similar to that out of wood....Hey we could use some of the stars I got today. Let's go make some!"
I had a bunch of scrap pieces of 2x6's. I cut them to the dimensions we wanted them.

I put wood glue on the adjoining seam.

And then attached them with a nail gun.

I put wood glue on the points of the star, and then attached it with a brad nailer.

I couldn't think of a good way besides this. I angled the nail just about as straight as I could. Since a little poked out. I did them all from them same side, so that could be the back. I made sure to do them on the opposite side of the other one.

Then I wiped off any extra glue.
And it was done! Ready for paint!


I painted them with the same Hesston Equipment paint that I used on my Front Entry Gate.

All done! Cost me 20 cents. And some scraps and paint I already had sitting around. And they probably took me 20 minutes to make!
I LOVE a good Knock-off!

Never miss a new post!
Check out 2 Crafty 4 My Skirt on Facebook for items that you can custom order or just to stay updated on new projects!
This Post is Sponsored by: Alese Stewart Photography, Reclaim-ologist and Other Crafty Chicks, Shabby Apple Dresses, My Own Labels
, mymemories.com, LittleTikes.com, Little Giant Ladders, LeonisaLinking to: Tip Junkie, Savy Southern Style Between Naps on the Porch, and these other awesome link parties.
Monday, August 5, 2013
DIY Porch Shelf
A few months ago my mother-in-law asked me to help her sell a few items. One of them was this planter shelf her father made for her years ago. I posted it on my facebook page and had quite a few people who wanted it. After selling it to the first one to ask I offered that I could custom build a similar one for others who were interested.

View this tutorial on my new site!

View this tutorial on my new site!
Monday, June 17, 2013
DIY Small Firecracker Decoration
Today I am showing you how I made these cute little firecrackers!
.jpg)
I was inspired by my own project. Last year I showed you this one that I made out of 2x4's.
View that tutorial here!

First I got some scrap peices of 1x2's. I cut them at various lengths. Then I painted them red, white, and blue with acrylic paint. I sanded the edges all the way around, and then put stain over the entire block.
.jpg)
I got the drill and used a bit the same size as my wire to drill holes in the top of each 1x2.
.jpg)
I used Gorilla Wood Glue to put them together.
to put them together..jpg)
I wrapped pieces of wire around a pencil to make them curly, and then shoved them down into the pre-drilled holes. I stacked them two diferent ways and some got a star around them and some didn't.
e.jpg)
I LOVE how they turned out. Nice size, made from scraps, and so cute!

Never miss a new post!
Check out 2 Crafty 4 My Skirt on Facebook for items that you can custom order or just to stay updated on new projects!
This Post is Sponsored by: Alese Stewart Photography, Reclaim-ologist and Other Crafty Chicks, Shabby Apple Dresses, My Own Labels
, mymemories.com, LittleTikes.com, Little Giant Ladders, Leonisa Linking to: Tip Junkie, Savy Southern Style Between Naps on the Porch, and these other awesome link parties.
Subscribe to:
Posts (Atom)